Placemarks
Learning Activity: Fly to an Address
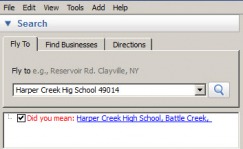
Enter your home address or work address in the Search Window’s Fly To box. You can often just enter the street address and the ZIP Code. Don’t be concerned if the view is blurry. Just zoom out. Google continues to update these satellite maps, and not all areas have been updated yet.
Your search results are held temporarily, but may be saved. We’ll be adding a placemark for your home. Public sites such as your school already have placemarks assigned to them. To find a location such as your school, just enter the school name and ZIP code. If there is more than one choice, a list will show and you can uncheck the ones you do not want. Double click to go directly to your desired location. To delete a location from the temporary search results, simply highlight and press delete.
Google Earth Placemark Guide
Learing Activity: Add a Placemark
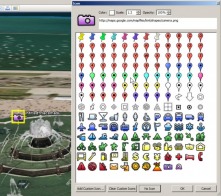
Click on your home address and click the “add placemark icon” on the top of the menu. Enter your name in the Name field. Change the look of the placemark by clicking the yellow push pin icon behind your name and selecting a different icon such as a flag or star. Save locations from your search window by dragging them into your Places window. You can create folders in Places to organize locations you save. The file you create is a .kmz file. The individual location or the entire folder may be saved by right clicking and selecting "Save Place As."
Learning Activity: Snapshot View
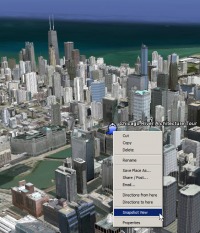
The Snapshot View command allows you to assign a specific camera angle and altitude to a placemark or folder. First adjust the tilt and angle until you get the view desired and then use the snapshot view command. Users viewing your placemark will see it from the same view I see. This is especially useful when creating tours or when you want to highlight a specific area or feature. Right click on the placemark and select Snapshot View. And it's all set. Try changing the camera angle and altitude and click on the placemark and like magic, you are back to the same exact viewing location.
Learning Activity: Add an Image
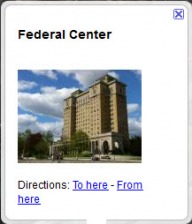
Find the FederalCenter in downtown Battle Creek. In the Search, Fly to window, enter the address: 74 Washington Ave N, Battle Creek, MI49037. Place a placemark on top of the building. Name it FederalCenter and in the description copy and paste this text including the < >. <img src= "http://pics2.city-data.com/picthumbc/thumbc19566.jpg"> Try this for another location, such as your school. The image you use must be an image you can find online. Replace the address between the quotes with the address for your image. To find an image address when the image is on a web page, right click the image and go to properties. Copy the address that ends in .jpp,.gif, or .png. This also works if the image is stored locally, by entering the entire address.
Learing Activity: Add a Hyperlink
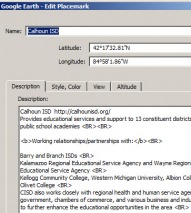
Create a description for a location with a web address, such as your school. The web address should include the http:// in the address. If you have success, try adding a photo using the HTML code above. To add carriage returns in the description, use the HTML’s code of: <BR>. To center an image add the <center> and </center> HTML text around image.
Learning Activity: Embed a YouTube Video
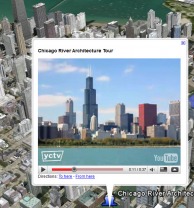
Choose a video from www.youtube.com (or upload your own and use it.) Copy the HTML code from YouTube’s embed field. Choose a placemark you've created that you'd like to enhance with video, or create a new placemark by going to a locations and using the the Add placemark tool. Name your placemark and give it an appropriate icon. While the Properties window is open the exact location of the placemark may be moved for exact placement. In the Description field, paste the YouTube HTML code. Click OK. When you next click on this placemark the YouTube video will be in the placemark’s window.
How to embed YouTube videos in Google Earth - Step-by-Step Directions
Learning Activity: Save your Placemarks
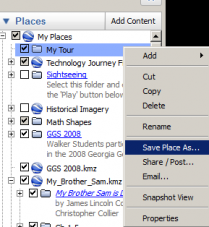
You can save placemarks, shapes, and entire folders (and their contents) to your computer's hard drive. The placemark file or folder is saved as a single file in KMZ format, which you can open at any time in Google Earth. Just right click on an item or folder and select Save Place As…You can email any placemark, shape, or folder from within Google Earth, but you can also email any KMZ file. You can post a .kmz file to the Google Earth BBS where other Google Earth users can view the information. Each time you start Google Earth, all the places data is processed during startup, even if it is not turned on. Save folders of files on the hard drive to improve Google Earth performance.
Activity: Right Click on My Places and select Add > Folder. Name the folder My Tour. Drag placemarks, overlays, paths...which you want saved into this folder. These may be created by you or others. Right click on the folder and select Save Place As... This saves the file as a .kmz file.
Fun Activity: Explore Monster Milk Truck with Google Earth Plugin for Browser
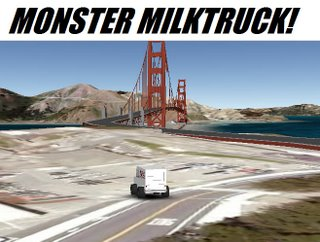
Install the Google Earth plugin API for your Windows browser and use the cursor keys to drive the a 3D milk truck around. You may start the truck at a variety of locations. It's a lot of fun.
http://www.gearthblog.com/blog/archives/2008/05/monster_milk_truck_game_for_google.html
Additional Resources
Curriculum Connections
How could embedded text, images, and multimedia be put into placemarks to help students learn about an area you are studying?
Related Sites
Hall Davidson's Codes to Cut and Paste for Google Earth.doc
TechTipChicks Blog from Texas - with well organized list of Google Earth Links
Technical (opens new Weebly page)
Open GL vs. Direct X mode
Google Earth Pro vs. Google Earth Standard (free) - what's different?
